Showing posts with label Imperial Fists. Show all posts

17 July 2014

Imperial Fists Dreadnought


I mentioned last time that I had found one of my old Dark Templar dreadnoughts whilst on a routine sweep of the man-cave. There used to be two of them in my old DT army, both Las/Missile with extra armour and smoke launchers (strangely I cannot find any photos of them in their original dark green).

They were always a solid addition to any army list and participated in quite a few tournaments before I turned to Chaos. However, it was time they found a new lease of life.


I've managed to get some paint on this guy, over the course of nearly two weeks – a little every day. It allowed me to expand on my yellow recipe that I've been developing and bodes well for the vehicles to come. The dread still need some details finishing but he's pretty much there and was a relatively easy win for the new Imperial Fists.


The other Dark Templar Las/Missile Dread 'twin' was last seen a good four years ago on the blog, as part of my fledgling Blood Angel army which saw its way onto Ebay a long time ago.


Alas, with the quick win of the dread, the rest of the painting suffered. The Tactical squad were making great progress up until the dread made an appearance. I have promised myself not to put paint to anything else until this unit is complete, then they'll need their Rhino.

More soon…


14 July 2014

Building My Starter Imperial Fist Army…


So the painting of the Imperial Fists continues slowly – snail's pace at the minute due to work and house chores. In the meantime I've been thinking about what I should be aiming for with my fledgling force.

The rule of thumb in the past was always start with a single HQ and two Troop choices. I appreciate that we now have Unbound army lists available, but I like the structure (and new bonuses) of the traditional Force Organisation chart.


As you will have seen I have my 'test' Tactical squad well under way. They were my trial models for my yellow paint scheme so will always look a little rough around the edges but that's all good. I will be building a Heavy Bolter marine for this squad as I'm not sure the Missile Launcher will be the best choice. A second Tactical squad can be built relatively easily with the spares I have already. As for transports, I have one Rhino/Razorback  almost built but will need another pretty soon.


So that was easy enough, but what about HQ choices? I have several available, but not sure which way to go at the moment. Naturally I have Lysander – the monster that he is – but his points costs is quite a chunk for a starter army so I may have to look elsewhere. I do have a couple of Librarians, but I'm wondering if I'm better off with a Captain to begin with. From what I'm reading, something like the Burning Blade would be a good close combat weapon to be wielding, with some artificer armour and maybe a storm shield/iron halo. Either way, with the new Challenge rules (wounds overspill onto unit), having a combat monster in there seems a good idea, rather than a token character who will fall over his own breath in melee. Decisions to be made here, but as it's a single figure it can wait until late on.

I was lucky enough to 'discover' a Dark Templar dreadnought in a box over the weekend. I knew he was about somewhere, but hadn't managed to find exactly which box in the garage was hiding him.

The dread was painted up in the old Dark Templar green and black, quite a rushed job especially on his Lascannon and Missile Launcher arms. Needless to say he has received some TLC and is looking far more glorious and intimidating… as all dreadnoughts should!

Pictures of him, and the evolving Tactical squad soon.

With the first game against Bull's Orks coming up in just less than 4 weeks, lots of banter coming up soon!

05 July 2014

Paint Table Saturday: 5th June


Well, it's been a yellow couple of weeks to be sure. I have to say, I've got something of a painting bug at the moment, which doesn't happen often these days. I'm finding time to do some painting every day… even if it's only 10 minutes.


The first ten Tactical marines in my fledgling Imperial Fists army all have paint on them, albeit their at different stages of the yellow process.


Lurking impatiently behind them is a unit of Terminators, who just need a bit of attention on their bases before going through to the undercoat room (the man-garage!).


Behind those in the queue is a five-man Devastator squad, who just need a couple more resin shoulder pads then they can see some spray time too.


Of course all these marines need someone to lead them. Being a person who likes option I have four HQ choices ready to go. Imperial Fist Captain Lysander is still in his blister pack, as is the limited edition marine Captain (a plastic re-make of the 1990 Games Day figure). I also have two plastic Librarians part-built. The Psychic phase of 7th Edition 40k seems to be a big deal, so the more psychics the better it seems. One is the new plastic Librarian (pricey!) and the other is the Limited Edition Dark Angel's Librarian (who will be suitable converted).


On the vehicle front I have a Rhino and my Stormraven part-built and my Land Raider Crusader waiting in the wings.

Exciting times ahead… just wish I had a six week break from work this summer like some of you lucky folk ;)


01 July 2014

40k: How To Paint Yellow… part 2


So last time I explained the early steps in my recipe for painting yellow… more specifically Imperial Fist marines.


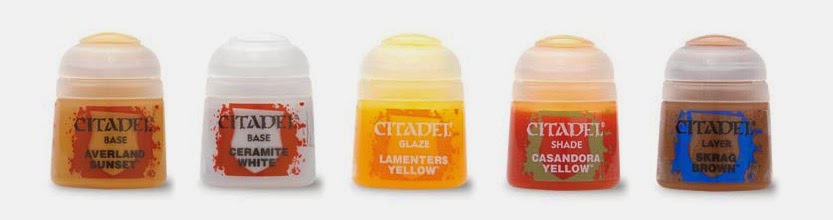
We finished last time with our model as above: Primed white, basecoat Averland Sunset, then highlighted by adding White to the base colour. I apologise for the pic above – not clever photographing yellow marines under a yellow light!


Once you're happy with your highlights, crack open the Lamenters Yellow glaze from GW. It's like a watered down ink and colours everything in a glorious yellow tone. Easy. For sheer speed this is probably good enough for your rank and file models.

You may decide to add a second glaze layer, or maybe you want to spend a little more time defining the armour. It's me, so I decided to push things a little further!


Next I took some GW Casandora Yellow shade. It's an orange/yellow colour and can make the miniature look very orange if over used. I applied it sparingly in the shadows and corners to add some depth. I then overlaid this with some more Lamenters Yellow to soften the edges.


With that done I just wanted a final shadow and highlight. I watered down some GW Skrag Brown and used a very fine brush to add thin lines in the recesses and to define joins in the armour. I then took White and added a tiny amount of Lamenters Yellow or Averland Sunset to make it more of an off-white. This was then applied to the raised edges, sparingly as a final highlight.


And that's it. The photos do look a little on the orange side (the models are not quite that orange in reality) but the colours used allow you a lot of flexibility. As I paint more and more of this yellow recipe I expect to get into a rhythm and the look will be a lot more consistent.

More examples of the yellow paint scheme coming up… including a vehicle perhaps!


30 June 2014

40k: How To Paint Yellow… part1


As regular visitors will know, I've been experimenting for a week or so trying to get a recipe for painting yellow marines that works for me. This weekend I made a decision about how I will proceed with my Imperial Fists army and wanted to pass on what I've learned.

I wanted to find a recipe that would allow me to paint the footsloggers rather quickly, but that could be expanded upon with the character models so that they looked awesome. I think I've found it, and all you need is 3 pots of paint (for the basic colour).


Going against all my years experience of painting 40k, I undercoat with white. This recipe does work with my usual black undercoat, but I've found results slightly better with the white. I like to make sure that the white is as solid as possible as it just makes things a lot easier down the line.


Next is a good basecoat of GW Averland Sunset. This is one of GW's base colours and covers almost anything in solid colour. Having said that I thinned it down quite a lot and gave the models a couple of coats to be sure.

Now comes the most time consuming part – adding highlights. This is where you must decide how long you want to spend and how subtle you want the results. In this test model (below) I spent about half an hour trying to get some decent graduations in there that I would normally reserve for character models.


Take your Averland Sunset and start adding white. Do as many or few layers as you like – obviously the more you do the better the graduations and final result – adding slightly more white to the mix each time and keeping the paint thin. You want your final fine highlight to be pretty much pure white.

At the moment our model is looking rather pastel and washed out, but the magic is coming. However, if you find you've lost a lot of the original pure Averland Sunset in the shadow areas, don't be afraid to go back in and repaint some shadows.

More tomorrow (once I've taken some more photos!)…


27 June 2014

New Addition…


As a distraction from all the yellow paint, I decided to get on with one of the bigger models from my latest 40k investment.

The Stormraven Gunship is a model that I've never built before and one that I've liked the look of for a while. It's comparable to the Land Raider in many ways… except it's a flyer.

It's taken a couple of evening to get to this point. It is finally recognisable not it has its wings but without any guns or turrets it's still a little toothless. At the moment the model is very back heavy, causing it to lean back. Once the model is complete I will see is this is still the case and may have to jury rig something to add more weight to the front.


I'm still undecided on whether I should glue the front ramp shut or not. I've no intention of painting the interior so having it open seems a little pointless, and leaves the possibility of it breaking off.

I'm also hoping to have some of the weapons interchangeable, but I'm not going to sink lots of time into this. I need to get models painted so it's more important models are built rather than versatile for the moment.

I'm hoping to paint the pilots separately from the main model but again, we will see what time allows. I'm hoping to finalise my yellow armour recipe this weekend, then the mass production can begin!

More soon…


25 June 2014

More Imperial Fist Armour Tests


I've managed to get a bit more time this week trying out different recipes for yellow armour.

This time I picked up Averland Sunset, a base paint from GW that they use in their current tutorials. I have to say, even over the bare plastic it produced a lovely solid colour in just a couple of layers. This could be where we need to be!

It is a very orange colour – as you can see above – so definitely a starting point for Imperial Fists, not a final solution. However, it provides a solid flat colour which was the point of the exercise.


I was so impressed with the result that I went back and re-painted the previous three test models in Averland Sunset!

This weekend I intend to pick up some more of GW's yellow paint, inks and glazes. Then I can take this trial to the next stage and make some decisions about a final armour colour. I need to hurry up as I'm filling up my painting tray with unpainted Terminators!

More soon…


22 June 2014

Imperial Fists – Yellow Tests 2 & 3


After several days ill last week, and the jobs still mounting in the new pad, it's been a struggle getting any hobby time in – thank god for scheduled posts!


These next two tests for the yellow Imperial Fists armour were a variation on the first. Instead of spraying the Daemonic Yellow directly onto the bare plastic, I decided to undercoat the models first – one in white and the other in black.

I went about adding the yellow spray whilst doing chores today, stopping the work periodically to add some more colour before going back to the job in hand.


At first glance everything looks pretty rosy in the image above, but not so.

As you can see, spraying over a black undercoat makes everything a dirty greeny colour. The coverage wasn't great and there was a lot of texture.

The coverage on the white undercoat was much better, maybe slightly better than Test 1 last week. I thought that I might have found my solution until closer inspection revealed, just like the black test, there was a shocking amount of texture on the model. Once a colour wash hits these yellow surfaces this texture will show up like a neon light. Such a shame.

It's looking like the yellow spray is not the way to go – the search continues…


17 June 2014

Imperial Fists – Resin Test 1


I had decided to try replicating the sculpted shoulder pads for my Imperial Fists. The image above shows the official GW pads, after a lot of cleaning up – they were a mess when they arrived, not finished at all. I know from my experiences with the resin bases that without some kind of vacuum chamber bubbles will be an issue. However, as long as they're not too bad they can be written off as battle damage.


Eventually I found my resin gear amongst the boxes still piled high in the garage. I had stuck the pads on a bit of plastic sprue to help the flow and created my silicone mold. The materials I have are quite old now so I wasn't expecting great results if I'm honest.

The mold was left overnight to cure, then the tricky task of digging out the original pads without damaging the silicone began. At times like these my patience goes out of the window as my excitement takes over. Despite this, I got the pads out unscathed.


Next I mixed up (way too much) resin and started to inject it carefully into the mold. A couple of hours later (just to be sure) it was ready and I released my shiny new white pads to inspect the results.

One had a large bubble all but destroying the icon. The other three looked pretty good and I cleaned then up with a knife and file. Alas, in my enthusiasm I broke one, but I still had two which looked pretty good.

The real test will come once they are painted but they'll do for now.

More soon…


16 June 2014

Imperial Fists – Yellow Test 1


So I got a few minutes this weekend to try out one of the options for painting up my new Imperial Fists army. Option 1 consists of a large can of Army Painter Daemonic Yellow, spraying directly onto the bare plastic model.

The coverage was pretty good, although the finish was a bit heavy and textured – I mustn't have given the spray can a good enough shake! I also used a ridiculous amount of spray paint for one model, very uneconomical but needed to be tested.

Once the spraying was dry I went in with the same coloured paint on a brush to touch up the gaps. Alas, the tube version of this colour was very opaque and wouldn't cover the last bits of exposed plastic. It did boost the colour of the paint already on the model.


Once this was dry (or maybe slightly before as I was excited to see results) I added some W&N Sunshine Yellow ink – watered down at first, then straight out of the bottle. Again it boosted the colour of the armour and sat in the recesses to underpin the edge of armour plates.

A rather rough looking model at the moment but I've learned a lot. I was a little disappointed if I'm honest as I was hoping this would be the ideal solution straight off the bat. I have a couple of other options to try before I choose which one to go with.

Stay tuned…


13 June 2014

The New 40k Project…


As regular readers will know, new projects come and go on a weekly basis in my hobby time. None of them are ever off the table, until they're truly off the table and in the bin or on Ebay.

I was very cynical about the new 40k release – I still am if I'm honest – but with big Ork releases on the way it was a great opportunity for Bull to dust off his greenskins and have more fun with the Waaaagh! I needed to offer him a challenge. I have my Chaos forces in boxes (many unfinished) but we did that when the last 40k was released. It was time for something new.

I was going to finally get stuck in with my long-term Dark Templar marines (which haven't actually been started properly yet) but that seemed like a massive ask – I needed something quick and easy. After my experiences with the Nurgle Blood Bowl team – how quick and easy that was painted – I felt that this was the way to go. I needed a coloured undercoat, a quick colour wash, maybe a highlight or two, then finish off the details. I needed a proper production line approach to painting the new army.


I spent days going over the space marine chapter options versus the colour sprays available. It was a very difficult decision but eventually I went with Imperial Fists – bright yellow armour… I must be mad!

I managed to construct two full Tactical squads from the random sprues I had in the garage, leftover from previous armies. I also found a brand new Rhino and a Dreadnought (which will need some attention). It was now that my attention turned to Ebay.


First on the list was Captain Lysander – a bargain at £5 (albeit it appears to be a dodgy resin knock off) – followed by some additional Rocket Launchers for a Devastator unit. I did toy with the idea of going with some second-hand Terminators to accompany the Captain, but the quality vs final price on Ebay just didn't work for me. On a whim I decided to do the complete opposite!


GW have been doing a army box set comprising almost entirely of Terminators, so I jumped in with two feet. I now have more models than I can shake a stick at. A couple will find their way back onto Ebay to help recoup some of the outlay, but the next few weeks will see a production line not seen since my Bezerker tournament army days.


However, I decided to throw myself a little curve ball. I bought some of the GW sculpted shoulder pads and will attempt to amend then replicate them en masse. This will form a trial run for my Dark Templar marines, for when they finally see the light of day. There's been a lot of theory crafting in this respect since the days of casting my own resin bases. Plus the cost and quality of the official GW resins pads are so prohibitive to use across the army that I needed an alternative solution.


So, let the building commence!

I've got a test model ready for the yellow spray and in the meantime am building as much of the army as I can.

More soon…